


If this is your first time looking at a post from this series, have a look at this summary: Server Setup 0: Contents
In this post I’ll show you a few of the post-installation tweaks that will give us a solid base for the rest of the configuration work.
If you don’t have a cabled connection you’ll need to get wifi working – I’m not going to cover this, as there’s a huge variety of possibilities to work out before you get it working, but there are lots of helpful people out there on the internet if you get stuck.
SSH
This should be all set up, but we’ll check. First, I’m assuming your client computer is connected to the same network as the server, which it usually would be.
On you client computer, you’ll need an SSH client, fortunately all modern OS’s have one built in. On Windows open Command Prompt. On Mac OS, open Terminal. On linux, the name of the application can vary, but it’ll have something like term or terminal in the name.
Type this command, swapping username for the user you created when installing the system, and hostname for the hostname you created.
ssh username@hostname
The first time you do this, you’ll probably get a warning something like “The Authenticity of the host could not be established….Are you sure you want to continue?” This is normal, and should only happen once. Type yes and press enter to continue.
You’ll then be prompted for the password – you created this during the installation.
If it all goes according to plan you’ll see something like this (obviuosly without the blocked out things):
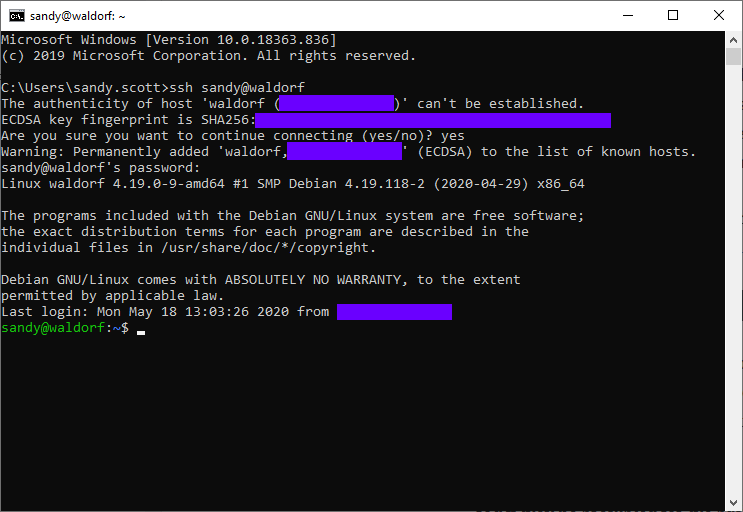
The username@hostname:~$ prompt is a sure sign you’re logged in properly.
If it doesn’t work…
The most likely thing is that your router isn’t smart enough to pick up the hostname from the server.
Find out the IP address of the server by logging in locally (ie. with a screen and keyboard connected directly to the server) then type ip address and press enter.
sandy@waldorf:~$ ip address
1: lo: <LOOPBACK,UP,LOWER_UP> mtu 65536 qdisc noqueue state UNKNOWN group default qlen 1000
    link/loopback 00:00:00:00:00:00 brd 00:00:00:00:00:00
    inet 127.0.0.1/8 scope host lo
       valid_lft forever preferred_lft forever
    inet6 ::1/128 scope host
       valid_lft forever preferred_lft forever
2: enp2s0: <BROADCAST,MULTICAST,UP,LOWER_UP> mtu 1500 qdisc pfifo_fast state UP group default qlen 1000
    link/ether 00:c0:08:8f:ea:e8 brd ff:ff:ff:ff:ff:ff
    inet xxx.xxx.xxx.xxx/24 brd xxx.xxx.xxx.xxx scope global dynamic noprefixroute enp2s0
       valid_lft 857109sec preferred_lft 857109sec
    inet6 fe80::363d:fd19:4c73:a0b3/64 scope link noprefixroute
       valid_lft forever preferred_lft forever
where you see the xxx.xxx.xxx.xxx that’s the IP address your server has.
Go back to the client and try this command, swapping in the IP address.
ssh username@xxx.xxx.xxx.xxx
Prevent IP from changing
Your server got its IP address from the router, but it could change if the server reboots. We don’t want that. There are 2 ways of doing this:
Address reservation
This is feature of your router – you’ll need to refer to the manual for that router to get sepcific instructions, but the basic steps are:
- Log into your router
- Find the list of devices on your network
- Find the server in that list.
- Look for an option that says something like “reserve this IP address”. On my router it it’s a tickbox that says Always assign this network device the same IPv4 address and looks like this:

Fixed IP
This might be a bit more work, but almost all routers should support doing this. The main thing to avoid is you giving the server an address that the router might hand out to something else, so:
- Log into your router
- Find the DHCP server settings – this will basically be two boxes with a minimum and maximum IP address.
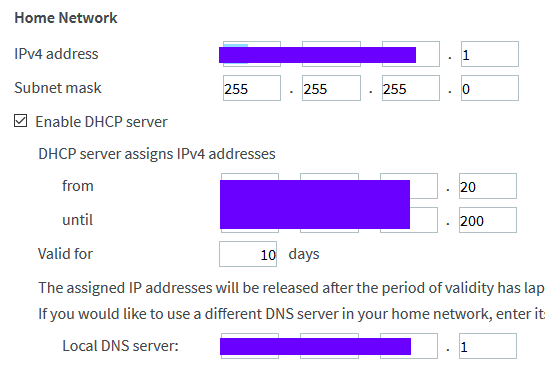
- In this example the top line is the router itself – we can’t give our server that address.
- The next line is the subnet mask – without getting in the details, the fact that the last box is zero means that we can pick any address where the first 3 boxes are the same as the server, and the last box is somewhere between 0 and 255.
- The next two boxes are the DHCP range – the router could give out any address between xxx.xxx.xxx.20 and xxx.xxx.xxx.200 so we can’t give our server an IP address in there.
- Based on this you could give the server any of these IPs:
- xxx.xxx.xxx.0 (I wouldn’t recommend this)
- xxx.xxx.xxx.2 to xxx.xxx.xxx.19
- xxx.xxx.xxx.201 to xxx.xxx.xxx.255
- The first and last can sometimes be used for special things, so I’d probably pick xxx.xxx.xxx.201 for the server.
You can log out of the router now, we aren’t going to change anything.
Setting fixed IP on the server is a little involved, so I’ll defer this page:
https://linuxconfig.org/how-to-setup-a-static-ip-address-on-debian-linux
You’ll need to log in locally as root for most of the tasks.
Sudo installation
Sudo is a useful command that lets an ordinary user run commands as root, allowing them to do system administration, which is what we want!
So, first we become root. type su -, press enter, then type the root password and press enter.
sandy@waldorf:~$ su -
Password:
root@waldorf:~#
The last character of the prompt has become #, signifying that we are now root. The next 3 commands:
- Install sudo
- Add username to the people who can use the sudo program
- Exit out of root mode
apt install sudo
/sbin/adduser username sudo
exit
We need to log out and log back in for this to take effect, so enter exit again then log back in.
Test it:
sudo echo "Hello World"
You should get a warning about taking care when using sudo, and a prompt to enter your password (not the root password). Do that, then Hello world should appear on a new line
sandy@waldorf:~$ sudo echo "Hello world"

We trust you have received the usual lecture from the local System
Administrator. It usually boils down to these three things:

    #1) Respect the privacy of others.
    #2) Think before you type.
    #3) With great power comes great responsibility.

[sudo] password for sandy:
Hello world
sandy@waldorf:~$
Set editor
There are plenty of editors available out there
- Nano is a simple, basic choice that’s the default on many linux systems.
- Emacs is a popular & powerful editor with hundreds of commands available.
- Vim is powerful & customisable but practically unusable until you’ve mastered the basics.
You can do your own research about which you’d prefer to use but once you’ve made your choice, you can make it the default with this command:
sudo update-alternatives --config editor
sandy@waldorf:~$ sudo update-alternatives --config editor
There are 3 choices for the alternative editor (providing /usr/bin/editor).

  Selection    Path               Priority   Status
------------------------------------------------------------
* 0            /usr/bin/vim.gtk    50        auto mode
  1            /bin/nano           40        manual mode
  2            /usr/bin/vim.gtk    50        manual mode
  3            /usr/bin/vim.tiny   15        manual mode

Press <enter> to keep the current choice[*], or type selection number: 2
sandy@waldorf:~$
Have a look at this post for another optional step – getting copy & paste working in the terminal.
Remove CD Repository
During the install, the USB stick was treated like an internet respository for installing software. Now we’re removed it, we might need to tell Debian not to look for it, which will get rid of it to avoid any warnings
Edit the apt sources file:
sudoedit /etc/apt/sources.list
Look for a line the begins deb cdrom:. Put a # at the beginning to comment it out so that line is ignored. Save and exit the file. Finally lets update the cache:
sudo apt update
It should go though without any warnings. You might find some packages to upgrade, in which case do so with:
sudo apt upgrade